
Recommended procedure for installing Debian GNU/Linux 11 (bullseye) on ARM64-based machines
Posted on by Daniel Kulesz
Category: meta
If you want to run Linux on ARM64-based machines, Debian GNU/Linux is an excellent distribution choice. Due to its universal concept, it works great on laptops, workstations and servers alike. Unfortunately, Debian officially supports only a small number of ARM64-based machines (12 at the time of writing). Yet, you can run Debian unmodified on a lot more ARM64-based machines - if you manage to install it. After discussing some basics and showing how to check the support status for a particular machine, this article describes my recommended way for performing the actual installation using a concrete example.
NOTE: This article is a major rewrite of my previous articles covering similar topics. Apart from updating it for Debian GNU/Linux 11, I removed instructions for Devuan GNU+Linux to reduce the number of IFs and make the article simpler to follow (not because I discourage using Devuan GNU+Linux).
Why use official distributions?
Before we dwelve into details, let’s first discuss some basics. I often hear the argument that people want to solve basic stuff like installing the OS as quickly as possible and focus on the more interesting stuff in the layers above. Usually, these people end up downloading and flashing one of the countless unofficial OS images from the Internet. What’s wrong with that?
Choosing a good base OS for your setup is the foundation for running a trustworthy and secure system. Sure, this might be irrelevant for a quick and dirty test setup. However, if you want to run your system for years and put personal data on it, this aspect can be important.
Personally, I discourage using unofficial images for a number of reasons:
- Many unofficial images bundle additional software that is not packaged in the official repositores. Therefore, you never get updates for them. This is bad, especially for security-critical components such as the kernel.
- In addition to trusting the upstream project (such as Debian), you also have to trust the projects and individuals that built the images.
- Apart from trusting these third parties, you also have to trust their build infrastructure.
- Setting up the system yourself, you can optimize the setup to your needs from the very beginning.
On the other side, running an official distribution, you can be sure to get the best “vanilla” experience. In addition, all the base software for your system comes from official sources and was build on their official infrastructure.
Why use this tutorial instead of the official documentation?
You may wonder why I recommend following this tutorial instead of installing Debian on your machine using Debian’s official documentation. Here are the arguments:
- My approach makes it possible to run the official and unmodified Debian versions on machines for which Debian does not provide official installation instructions (I refer to them using the term “unofficially supported machines”).
- My approach uses the flash-friendly f2fs filesystem that greatly reduces wear of your flash memory and improves its performance while the official installer does not support f2fs.
- My approach replaces most parts of systemd with sysvinit (Devuan is still a better choice if you want to avoid systemd completely).
- My approach produces nice universal tar archives that can be used for installing Debian to more ARM64-based machines within minutes instead of going through the time-consuming installer process each time.
- My approach uses the modern extlinux configuration of the u-boot bootloader (instead of the outdated binary format that is difficult to edit).
Unofficially supported machines
The Linux kernel supports a variety of ARM64-based machines. Unlike x86 machines, ARM64-based machines require a machine-specific device tree binary (dtb) that is built from source. As Debian aims to be an universal OS, it ships a generic ARM64 kernel that enables support for as many of these machines as possible by shipping dozens of dtbs.
The current Debian GNU/Linux 11 (bullseye) release ships version 5.10 of the Linux kernel. To look up the machines it theoretically supports, do the following:
- visit to
packages.debian.org. - use “search package directories” with “only show exact matches” and search for the package
linux-image-arm64in the stable distribution. - hit the search button and click on the result.
- since
linux-image-arm64is a metapackage that depends on the current kernel, check which version it is (as of now, it islinux-image-5.10.0-7-arm64). Click on this package to show more details. - click on “list of files” to see all files contained in this actual kernel package and check the dtb files listed there.
If your machine is listed there, you might be able to run the official distribution of Debian on it.
If your machine is not listed, don’t give up yet - it might still be supported by a newer Linux kernel. Later in this tutorial, I will show how you can install a newer kernel in the current stable release and get regular updates for it. However, this only works if your machine is supported at least in the “unstable” release.
Don’t worry too much about the name “unstable” - the kernels in Debian unstable are based on well-tested kernels from upstream and usually work well. They are updated frequently and, thus, receive security updates. While I consider them okay as a daily driver, they are not as stable as the kernels from the stable distribution.
To check if your machine has support in the unstable kernel, repeat the previous steps but choose “unstable” instead of “stable” for the distribution. If your machine is still not listed, then you are out of luck for now as your machine is currently not supported (but it might get official support in the future).
Here is a small list of machines I tried this approach on using the current 5.10 kernel and U-Boot 2021.XX:
| Manufacturer | Make/model | Remarks |
|---|---|---|
| Olimex | A64-OLinuXino | Works partially (entering disk encryption password does not work over serial) |
| Xunlong | OrangePi Zero Plus | Works partially (NIC does not work, external USB NIC works fine) |
| FriendlyElec | NanoPi R2S | Works partially (incompatible with certain microSD cards, shutdown issues, only one NIC recognized ootb) |
| Pine64 | A64 Plus | Works great |
| Pine64 | A64 LTS | Works great |
| Pine64 | Rock64 | not tested yet with Debian 11 |
| Pine64 | RockPro64 | not tested yet with Debian 11 |
| Pine64 | Pinebook Pro | Works partially (booting off microSD cards fails, reboot issues, manual extra work needed) |
Installation
You have a board that is at least unofficially supported by the unstable kernel (see previous section)? Great - let’s get our hands dirty!
In the following, I will assume you want to install Debian GNU/Linux 11 on a NanoPi R2S by FriendlyElec.
Concept
My installation concept covers the following stepts:
- Installing a device-independent base system using the official installer
- Customizing the base system
- Adapting the base system for the target
- creating tar archives for boot and root
- building the bootloader (device-specific)
- assembling a device-specific image
- flashing the assembled image
This might seem a lot of work, but note that the firsttwo steps are device-independent. Thus, you won’t have to redo them when installing other devices in the future.
Requirements and assumptions
Apart from having an unofficially supported machine, I assume you have basic knowledge about the following:
- creating and operating virtual machines with KVM/QEMU using virt-manager
- operating your ARM64 machine over the serial console
In addition, you will need:
- a dedicated physical x86 machine with a fresh installation of Debian GNU/Linux 11 with at least 2 GiB of RAM and 20 GiB of storage
- a user account with a user named
youruser - an empty microSD card with a capacity at least 4 GiB
- a working internet connection
Of course, the tutorial should also work with other systems, distributions and environments but some steps may differ. Also, note that using a VM is only possible if you enable nesting as we will exercise the ability to run ARM64-VMs ourselves. Using very old hardware (e. g. a single-core 32bit machine) is theoretically possible but practically infeasible.
Disclaimer
All data and information provided in this tutorial is for informational purposes only. The author makes no representations as to accuracy, completeness, currentness, suitability, or validity of any information on this tutorial and will not be liable for any errors, omissions, or delays in this information or any losses, injuries, or damages arising from its display or use. All information is provided on an as-is basis.
In no event, the author will be liable for any loss or damage including without limitation, indirect or consequential loss or damage, or any loss or damage whatsoever arising from loss of data or profits arising out of, or in connection with, the use of this tutorial.
Step 1: Installing the base system
First of all, let’s create a directory where we will store all the assets produced in this tutorial:
mkdir -p /home/youruser/assets
Then, download the mini ISO for arm64 from the following location:
https://deb.debian.org/debian/dists/bullseye/main/installer-arm64/current/images/netboot/mini.iso
Make sure you also have qemu and virt-manager installed:
apt install qemu-efi-aarch64 qemu-system-arm virt-manager
Next, create a new virtual machine using the aarch64 architecture as shown here:
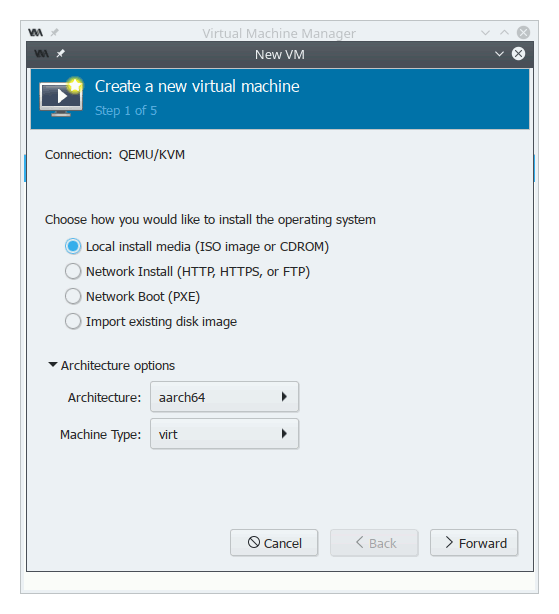
In the next step, choose the mini.iso you downloaded previously as ISO and select “Debian Testing” as OS. Give the VM the default of 1.5 GiB of RAM and as many cores as you have. Next, create a disk image with at least 5 GiB (or stick with the default) and leave the default network settings (using NAT). Finally, fire up your new VM. You should get a screen like mine:
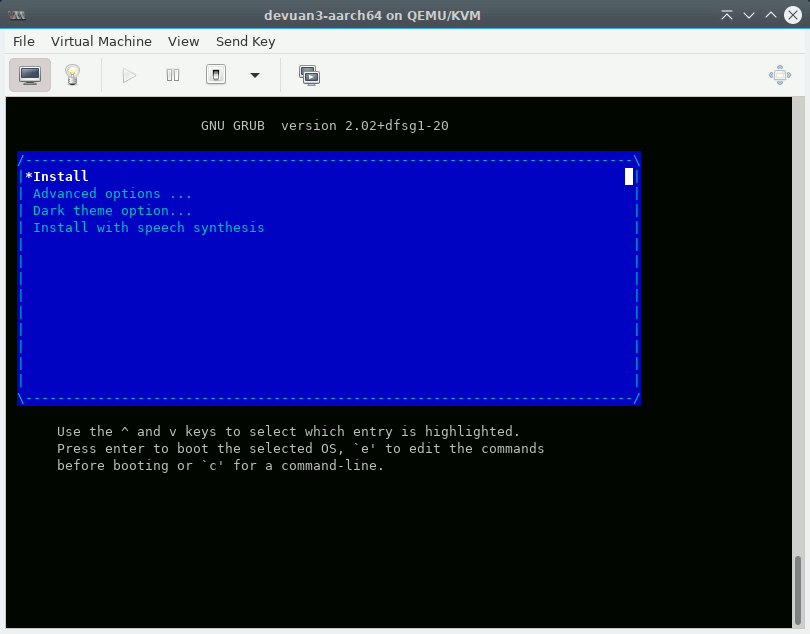
After selecting the first option, the “oldschool” text installer should boot and give you the following screen:
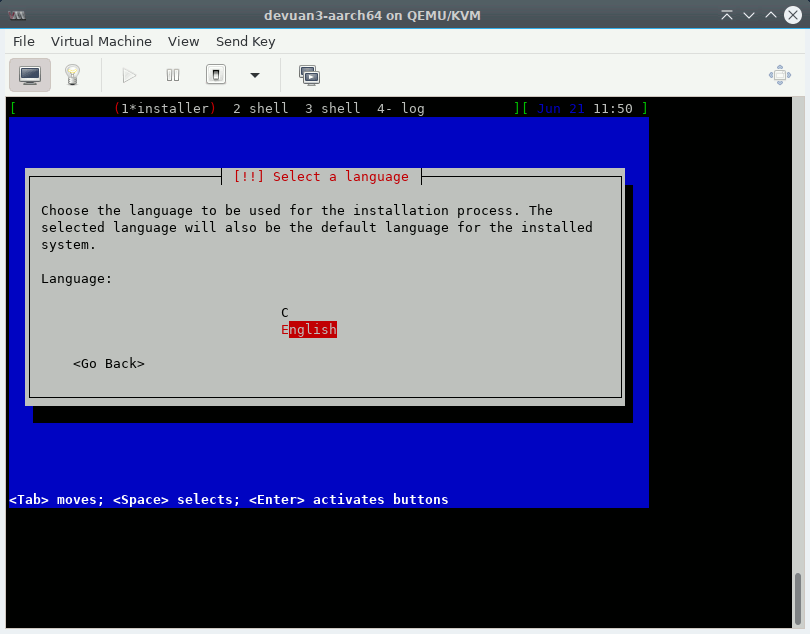
Now run through the installer but follow these guidelines:
- choose a generic hostname and domain name (we want to build a generic, reuseable image)
- choose simple passwords for root and the user you create (again, we want to build a generic image)
- use
deb.debian.orgas pkg mirror - partition the disk to have the following layout (watch my video for more details):
- Partition #1: Size 100M, type ESP (EFI Firmware), no mountpoint, bootable, name
efi - Partition #2: Size 500M, type ext4, mountpoint
/boot, nameboot, labelboot, not bootable - Partition #3: Size maximum, Type physical volume for encryption, name
rootencryptedno mountpoint, not bootable - Unside the encrypted volume, create a single ext4 partition spanning the whole outside partition with type ext4 and mountpoint
/, nameroot, labelroot, passphraseabcd(this will ease further setup) - no swap
- Partition #1: Size 100M, type ESP (EFI Firmware), no mountpoint, bootable, name
- when installing packages, unselect all packages for installation in tasksel (our aim is to get a minimal image, we will install specific packages later as we need them).
NOTE: Don’t be confused that the installer will display the crypto device being named
sda3_cryptor similar - that’s just the name of crypto device but not the partition label!
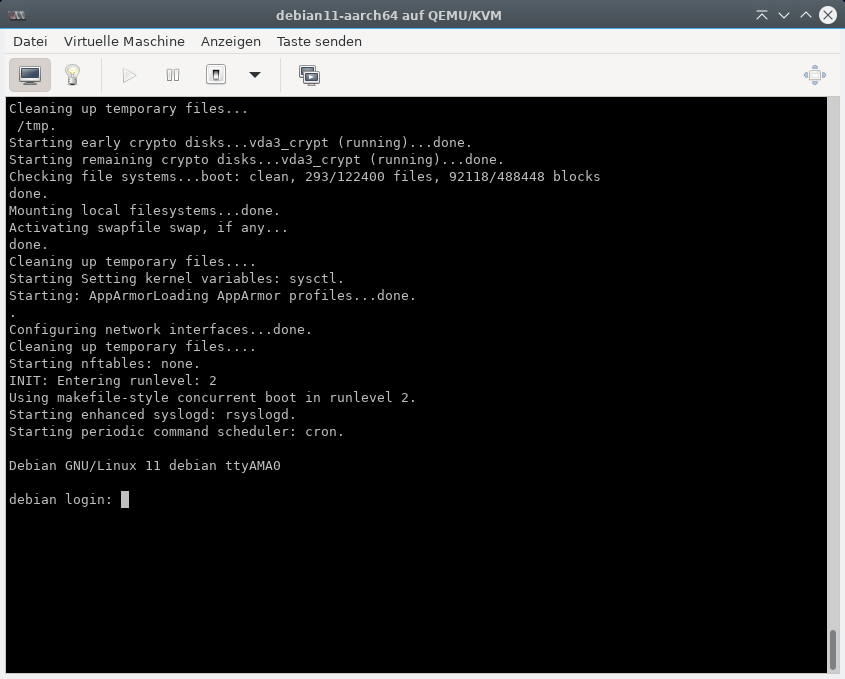
After installing, the system should boot up fine and present you with a login shell. In case the installed system does not boot but you get stuck in the Tianocore EFI shell instead, see the troubleshooting section.
Step 2: Customizing the base system
sysvinit
First, install sysvinit package and reboot (you could see some errors, ignore them):
apt install sysvinit-core
Enable the serial console (the virt target uses ttyAMA0, later at install time we will switch this to the device of your real hardware):
cat <<'EOF' >> /etc/inittab
T0:23:respawn:/sbin/getty -L ttyAMA0 115200 vt100
EOF
Then reboot:
reboot
After the reboot, system bootup should look as follows:
Now, you can remove most of the systemd bits by installing install libpam-elogind:
apt install libpam-elogind
ACPI
Install the acpi package for handling events such as button presses and sleep modes:
apt install acpid
f2fs
While the installer does not support installing to f2fs filesystems, f2fs is the filesystem I recommend for flash media. Add the module to /etc/initramfs-tools/modules:
echo "f2fs" >> /etc/initramfs-tools/modules
echo "crc32" >> /etc/initramfs-tools/modules
Install this package to get support for it:
apt install f2fs-tools
Time synchronization
WARNING: This part works but the daemon fails to synchronize the clock on boot and needs to be run manually. Any suggestions how to fix this are welcome.
Some arm64 machine don’t have a backup battery for their realtime clock (RTC). This results in the date and time being wrong each time you disconnect power. In general, even if your machine has a backup battery, it is a good idea to setup time synchronization.
Synchronizing date and time can be done using the NTP protocol. Debian ships several NTP clients you can choose from. Personally, I recommend OpenBSD’s openntpd as it is very lightweight and has been developed with security in mind. To install it:
apt install openntpd
It should start and also run on the next boot. To initially update the clock (openntpd takes a lot of time otherwise):
ntpd -s -d
DTB file handling
Since we want to use a separate /boot partition later, we need to make sure the dtb files for the current kernel are there.
Therefore, we create a dtb directory there first:
mkdir -p /boot/dtbs
And add the following script that copies the dtb files automatically each time a new kernel is installed or upgraded:
cat <<'EOF' >> /etc/kernel/postinst.d/copy-dtbs
#!/bin/sh

set -e
version="$1"

echo Copying current dtb files to /boot/dtbs....
cp -a /usr/lib/linux-image-${version}/. /boot/dtbs/
EOF
Let’s make this script executable:
chmod +x /etc/kernel/postinst.d/copy-dtbs
And run it once manually to copy the dtb files for the currently installed kernel:
/etc/kernel/postinst.d/copy-dtbs `uname -r`
Bootloader configuration
Create a directory to hold the bootloader configuration:
mkdir -p /boot/extlinux
And create an extlinux boot configuration file (the bootloader u-boot looks them up):
cat <<'EOF' >> /boot/extlinux/extlinux.conf
TIMEOUT 2
PROMPT 1
DEFAULT debian

LABEL debian
MENU LABEL Linux debian
KERNEL /vmlinuz
INITRD /initrd.img
DEVICETREEDIR /dtbs
APPEND net.ifnames=0 root=LABEL=root cryptopts=source=LABEL=rootencrypted,target=root_crypt,luks
EOF
Kernel from unstable (optional)
As discussed previously, it might be necessary to run the kernel from the unstable distribution for certain machines to work better at all. In addition, some board features might work better with kernels from unstable.
Note: At the time of writing, the unstable distribution does not provide a newer kernel yet. Hence, you will have to wait a few days/weeks before following this approach would make much sense.
Note: Some people recommend installing kernels from backports instead of from unstable. However, I discourage taking this approach as the kernels in backports often receive security updates quite late.
So, which kernel should you choose if your board is supported in stable as well? It depends. The only advice I can give is: If all features of your board that are relevant to you work with the stable kernel, stick with it. If not, try the unstable kernel.
To install the unstable kernel, we need to first add the unstable distribution to apt:
cat <<'EOF'>>/etc/apt/sources.list.d/unstable.list
deb http://deb.debian.org/debian unstable main
EOF
And specify that we only want to install the kernel from unstable (and no other packages):
cat <<'EOF'>>/etc/apt/preferences.d/99unstable
# Never prefer packages from unstable
Package: *
Pin: release a=unstable
Pin-Priority: 100

# Allow upgrading kernel from unstable
Package: linux-image-arm64
Pin: release a=unstable
Pin-Priority: 500
EOF
Finally, we can safely upgrade the kernel:
apt update
apt install -t unstable linux-image-arm64
Reboot
Before we continue to the next step, let’s reboot the system:
reboot
Step 3: Adapting the base system for the target
The following changes are “devastating” and will make the VM unbootable or “less unique”. Therefore, I recommend backing up its disk image before applying them (a snapshot would be even better, but KVM on Devuan3 does not seem to support them on aarch64).
Remove GRUB
Remove the grub bootloader (we will not use it):
apt autoremove grub-efi-arm64 grub-common
SSH servers (openssh and dropbear)
Install the regular OpenSSH server together with dropbear for unlocking the machine remotely during boot:
apt install --no-install-recommends openssh-server dropbear-initramfs
Change the dropbear port so we don’t run into conflicts with the main server (I recommend using different SSH keys for the main and auxiliary SSH server) and add a timeout:
cat <<'EOF' >> /etc/dropbear-initramfs/config
DROPBEAR_OPTIONS="-p 4748 -I 60"
EOF
Create an authorized-keys file that limits access to running the cryptsetup binary in dropbear (put your actual SSH public key here):
cat <<'EOF' > /etc/dropbear-initramfs/authorized_keys
no-port-forwarding,no-agent-forwarding,no-x11-forwarding,command="/usr/bin/cryptroot-unlock" ssh- ...
EOF
To set a static IP address that usually works more reliable than DHCP (replace the placeholders):
cat <<'EOF' > /etc/initramfs-tools/conf.d/staticip
IP="<client-ip>::<gw-ip>:<netmask>::eth0:off"
EOF
Finally, renegerate the initramfs:
update-initramfs -u
Configure the network
If you don’t want to use DHCP for the regular system either (recommended), make sure you edit /etc/network/interfaces accordingly.
For instance, to have a static IP:
# The primary network interface
allow-hotplug eth0
#iface eth0 inet dhcp
iface eth0 inet static
        address 192.168.2.11
        netmask 255.255.255.0
        gateway 192.168.2.1
        nameservers 192.168.2.1
Restrict access to the system
Delete the default user:
userdel -r user
Use the keys authorized for dropbear for system access as well:
mkdir /root/.ssh
chmod 700 /root/.ssh
cp /etc/dropbear-initramfs/authorized_keys /root/.ssh/
chmod 600 /root/.ssh/authorized_keys
Afterwards make sure you edit the /root/.ssh/authorized_keys file to remove the restrictions (each line should start with ssh-.
Replace fstab and crypttab
Replacing crypttab and fstab should be done as the last steps, otherwise regenerating initramfs might cause troubles. Replace the fstab as follows:
cat <<'EOF' > /etc/fstab
# <file system>        <mount point>  <type>  <options>                   <dump>  <pass>
/dev/mapper/root_crypt /              f2fs    noatime,background_gc=off   0       1
LABEL=boot             /boot          ext4    errors=remount-ro           0       2
EOF
To replace the crypttab file:
cat <<'EOF' > /etc/crypttab
root_crypt LABEL="rootencrypted" none luks,initramfs
EOF
Step 4: Creating tar archives
After tweaking the system to our needs, we want to create tar archives that will contain the contents that will be used for the boot and root partitions later. To do this, we will mount the disk images of the VM directly on the host and extract the files from there.
First, power down your VM:
poweroff
To extract the files from the VM, load the nbd module on your host.
modprobe nbd max_part=8
Mount the VM’s disk image (replace the path according to where you stored your virtual disk):
qemu-nbd --connect=/dev/nbd0 /var/lib/libvirt/images/debian-aarch64.qcow2
Mount the boot partition (the guided installation installs to the second partition by default) and create a tar archive with our bootfs and store it in our assets:
mount /dev/nbd0p2 /mnt
cd /mnt
tar cfvzp /home/youruser/assets/debian11-aarch64-bootfs.tar.gz .
cd
umount /mnt
Do the same for the rootfs as well:
cryptsetup luksOpen /dev/nbd0p3 someroot
mount /dev/mapper/someroot /mnt
cd /mnt
tar cfvzp /home/youruser/assets/debian11-aarch64-rootfs.tar.gz .
cd
umount /mnt
cryptsetup luksClose /dev/mapper/someroot
Finally, clean up:
qemu-nbd -d /dev/nbd0
Step 5: Building the bootloader
We build u-boot on the host machine.
The process of building u-boot is machine-specific! This is just an example!
Install dependencies:
apt install device-tree-compiler build-essential gcc make git libssl-dev python3-dev bison flex bc libssl-dev make gcc swig gcc-aarch64-linux-gnu gcc-arm-none-eabi
Clone ARM’s Trusted-Firmware source repository:
git clone https://github.com/ARM-software/arm-trusted-firmware
cd arm-trusted-firmware
Checkout the latest stable tag (check with git tag, it was v2.5 at the time of writing):
git checkout v2.5
Compile the firmware:
make CROSS_COMPILE=aarch64-linux-gnu- PLAT=rk3328 bl31
Leave the build directory:
cd ..
Next, clone the u-boot repository:
git clone git://git.denx.de/u-boot.git
Change into its directory:
cd u-boot
Checkout the latest stable tag (again, check with git tag):
git checkout v2021.07
Create a symlink to the previously produced arm trusted firmware build (if you built for a different board, adapt the link):
ln -s ../arm-trusted-firmware/build/rk3328/release/bl31/bl31.elf bl31.elf
Create the configuration from the default config (again, adapt it if you have a different board):
make CROSS_COMPILE=aarch64-linux-gnu- BL31=bl31.elf nanopi-r2s-rk3328_defconfig
Start the build (change -j16 to match the number of your actual cpu threads):
make -j16 CROSS_COMPILE=aarch64-linux-gnu- BL31=bl31.elf all u-boot.itb
Save the assets:
cp idbloader.img /home/youruser/assets/
cp u-boot.itb /home/youruser/assets/
Step 6: Installation / Flashing
With all goodies in place, we can now flash the contents to the storage of your machine. In the following we assume that your machine uses a microSD card for storage (such as the NanoPI R2s).
As a friend of the KISS principle I recommend using a dead-simple MBR partitioning scheme instead of using GPT.
First, change to our assets directory:
cd /home/youruser/assets
Now, insert your microSD card and check that is has been recognized:
dmesg
In the following, we assume that your device is recognized as /dev/sdX (replace /dev/sdX with the actual name of your device).
Now, overwrite the first megabytes of the card with zeroes:
dd if=/dev/zero of=/dev/sdX bs=1M count=256
Next, remove the microSD card and re-insert it so its partitioning information will be updated in your OS and check its assigned device name (could be the same as before, but could also be different):
dmesg
Then, create a template to hold our partition table (adjust the size of the boot partition if you have a bigger microSD card, but don’t make it too big):
cat <<'EOF'>>sfdisk.template
label: mbr
unit: sectors
first-lba: 64

start=        2048, size=       16384
start=       18432, size=      614400, bootable
start=      632832
EOF
Now, apply the template to your microSD card:
/sbin/sfdisk /dev/sdX < sfdisk.template
Now check dmesg again and make sure the three new partitions have been recognized (e. g. as /dev/sdX1, /dev/sdX2 and /dev/sdX3):
dmesg
Now, create an ext4 filesystem to hold our boot partition (flash wear should not be an issue as normally no writes occur on /boot during normal operation):
mkfs.ext4 -m0 -L boot /dev/sdX2
For the root partition, we create an encrypted partition, unlock it, and format it using the f2fs filesystem:
NOTE: To make encryption more secure, set the value for
--pbkdf-memory 25664 MiB lower than the physical memory available on your target device.
cryptsetup luksFormat /dev/sdX3 --label=rootencrypted --pbkdf-memory 384
cryptsetup luksOpen /dev/sdX3 somename
mkfs.f2fs -l root /dev/mapper/somename
Mount the boot partition, extract the tar archive :
mount /dev/sdX2 /mnt
cd /mnt
tar xzvpf /home/youruser/assets/debian11-aarch64-bootfs.tar.gz .
Some devices (e. g. the A64-OLinuXino) require a different DTB file than the one included in the Debian kernel package. In this case, overwrite the existing dtb file in the bootfs partition (replace <platform> by your actual platform):
cp /path/to/your/special/dtb-file /mnt/dtbs/<platform>/
Make sure you prevent your dtb file from being overwritten by kernel upgrades. Thus, once you booted the final system, adapt the file
/etc/kernel/postinst.d/copy-dtbsaccordingly.
Unmount the bootfs:
sync
cd
umount /mnt
Do the same for the rootfs:
mount /dev/mapper/somename /mnt
cd /mnt
tar xzvpf /home/youruser/assets/debian11-aarch64-rootfs.tar.gz .
Before we unmount it, take the chance to adjust the settings for the serial console. To do that, edit the file /mnt/etc/inittab and adjust the following line:
T0:23:respawn:/sbin/getty -L ttyAMA0 115200 vt100
This setting is not machine-specific but chipset-specific. Below are some examples for common SoCs:
| SoC | serial device | Baud rate |
|---|---|---|
| Rockchip RK3328, RK3399 | /dev/ttyS2 | 1500000 |
| Allwinner A64, H5, H6 | /dev/ttyS0 | 115200 |
Hence, for the NanoPI R2s, the serial device is ttyS2 (not ttyAMA0) and it uses a baud rate of 15000000 (not 115200).
Again, other boards may need different settings.
So, in our case, change the line as follows:
T0:23:respawn:/sbin/getty -L ttyS2 1500000 vt100
With that last change done, unmount the new rootfs
sync
cd /home/youruser/assets
umount /mnt
cryptsetup luksClose /dev/mapper/somename
As the last step, we need to write the bootloader to the device.
Warning: This procedure is SoC-specific! Other SoCs require different commands!
For our NanoPI R2s. do the following:
dd if=idbloader.img of=/dev/sdX seek=64 conv=notrunc
dd if=u-boot.itb of=/dev/sdX seek=16384 conv=notrunc
sync
Step 7: First boot
Bootup and first changes
That’s it! Hook up the serial console to your board, put in the microSD card and enjoy.
After bootup, I recommend to renegerate the SSH keys as follows:
rm -v /etc/ssh/ssh_host_*
dpkg-reconfigure openssh-server
rm /etc/dropbear-initramfs/*_key
dpkg-reconfigure dropbear-initramfs
Device-specific notes
Pinebook Pro
I found that booting from sdcard did not work properly. Using eMMC instead works fine. Also, there are issues with u-boot and the display that have to be worked around.
u-boot
At the time of writing, there are three issues with u-boot that have to be kept in mind:
- version
v2021.10-rc4is broken (does not recognize eMMC). Versionv2021.07works. - Debian does not work with preboot enabled (see below).
When compiling u-boot, comment out PREBOOT like this in pinebook-pro_defconfig:
# PREBOOT=y`
Display
In order to get the display working properly, you have to work with the device using the serial console. Add the following modules to initramfs:
cat <<'EOF'>>/etc/initramfs-tools/modules
analogix_dp
drm
drm_kms_helper
panel-simple
pwm_bl
pwm_rockchip
pwm_regulator
rockchipdrm
EOF
Afterwards, run the following:
update-initramfs -u -k all
In order to enter the LUKS password using your keyboard, add the following to the kernel APPEND line in /boot/extlinux/extlinux.conf:
console=tty0
Known issues
When rebooting the device, the screen output is garbeled.
Other devices
(under construction)
Troubleshooting
Boot stuck in UEFI shell
As of 2021-01-12, installations can become stuck in the Tianocore UEFI shell after the installation or when boot parameters of the VM are changed. The actual fault seems to be caused by nvram (the nvram file is written by libvirtd).
To fix this issue:
- start the VM
- When bumped into the EFI shell, type “exit” to get to the boot manager
- Choose “Boot Maintenance Manager”
- Choose “Boot Options”
- Choose “Add Boot Option”
- Select the presented boot option “No volume label …”
- Select
<EFI> - Select
<debian> - Select
grubaa64.efi - Press Enter to input the description
- Enter some name (e.g.
debian) - Select
Save and commit changes - Select Change Boot order
- Hit Enter
- use the +/- keys to move the new entry up.
- Select
Commit changes and exit - Select
Go back to main page - Use “F10” to save the changes
- Select
continue
External References
(The providers of these resources are solely responsible for them - see legal notice).
(none yet)
Credits
Last but not least, I would like to thank all the helpful minds in the official Devuan forums who helped me resolve various small issues I encountered when building up this concept.
History / Changelog
- [2021-09-19] Added device-specific notes for the Pinebook Pro
- [2021-08-21] Initial major rewrite for Debian 11 (based on earlier article, see its changelog for details on past changes)
Comments
(Comment features are provided by external parties and are not monitored by me.)
Coming soon